Introduction
Network automation and programmability is one of the hot topics in networking today. It is one area that I want to focus on this year and become very familiar with. One of the best resources that I found was the book “Network Programmability and Automation, 1st Edition” by Jason Edelman, Scott Lowe, and Matt Oswalt. Although it is only available in a pre-release (incomplete) version, if you have a Safari Books subscription I highly recommend checking it out. This book not only is extremely easy to ready, but it gives the high level ideas and theory that I feel is desperately needed for us network engineers. This whole programming idea is foreign to a lot of us, and just jumping right into coding can be a very daunting and intimidating task. This book is what gave me the clarity to feel confident enough to dive into automation.
In this blog post I will utilize a code example from the book that will allow you to automate network configuration templates. We will be using Python, Jinja2, and YAML. It is easy, low hanging fruit that will allow you to get your feet wet, and at the same time actually put this whole progamming and automation to practical use that every engineer can relate to.
Configuration Templates Today
Today, most baseline templates used for device configuration is stored one of two ways: a text file or excel spreadsheet. While both can be used effectively, they are error prone and also rely on engineers to copy/paste those configuations into the CLI. This Packet Pusher’s Datanauts Podcast includes talk about some of the downfalls that we face today with our current processes. I highly recommend this podcast to get some insight into how we are pretty inefficient into how we run things today.
By switching over to a more programatic and automated way to do configuration templates, a lot of the error prone mistakes can be removed, and it also helps you think of managing your network in a different way. It also allows you to try out automation and programming without the fear of actually breaking the network. Here we will just be creating configurations.
Jinja2
Straight from the Jinja2 website, “Jinja2 is a full featured template engine for Python.” Basically, it is a template that can be leveraged by Python in order to create complete configuration files based on what is in the template and what data is fed in. Because Python is one of the most popular languages used in network automation, Jinja2 is a natural choice for templating. Don’t worry too much if this is slightly confusing. Once we start diving in and using Jinja2, it will become very clear what it is and how we can leverage it.
To install Jinja2, you will first need to have Python installed. If you are running Linux or macOS, Python should already be installed. Open up a terminal and type “python.” If you get output similar to what is pictured below, you are ready to move forward with installing Jinja2.

If you are running Windows, follow the instructions from the official Python website: https://wiki.python.org/moin/BeginnersGuide/Download. I would recommend version 2.7 as I have found more documentation and support for 2.7, but the choice is entirely up to you.
Jinja2 works with 2.6, 2.7, and versions higher than 3.3. The easiest way to install Jinja2 is using pip. “pip install jinja2” is the command you will need to use. If on Linux or macOS, you will most likely have to use “sudo” to gain the necessary permissions to install.
[otaku@netlab ~]$ sudo pip install jinja2YAML
In order to really harness the power of using templates, we need a way to feed data into the template so that it knows how to populate the template. YAML is a human readable way to format data that can be imported into programming languages. YAML allows us to provide data in a structured way. To understand the importance of this, lets think about how we get data from Cisco devices running IOS.
If you run the command “show ip interface brief” on a router, you will get a nice little printout that is human readable of all interfaces, their IP address, status, etc., but the information cannot be used by anything other than a human. It is simply a wall of text. Let’s say that I had 200 routers that I wanted to check and see which interfaces have an IP address, but do not have an up/up status. Looking at the sample output of “show ip interface brief” would lead you to beleive that the theory of performing such a task is easy.
The table has all the information needed, right? I can see which interfaces have an IP address, and which ones have a status of up and protocol up, correct? Unfortunately, none of the data itself is related. It is just printed out. Other than a human reading it, that text serves no purpose and cannot be easily manipulated. If you wanted to create a script, you would have to come up with a way to search the wall of text and manipulate it to your needs.
Structured data, on the other hand, is already arranged in such a way that a programming language can understand each piece of data. Lets take the first line of “show ip interface brief” and put it into YAML format.
The first three dashes signify this file as a YAML file. The rest is the same exact information as the first line of the CLI output, but in this format a programming language can actually understand the information. You may be wondering why the value of FastEthernet0/0 is in quotes (while none of the other values are), and that is because values that have special characters need to be put in quotes so that the special character’s are seen as part of the string. The programming language will know that the value of interface is FastEthernet0/0. It will know that the IP-Address is set to 192.168.1.1. If we were able to get this kind of data from the router, then we could easily make a script that parses the information and looks for criteria matches. This is the power that YAML and other structured data sets bring to the table for network automation. If you have ever created a script that had to parse text, known as screen scraping, you will understand how powerful structured data can be for the networking world.
To use YAML with python, you will need to install pyyaml. Use “sudo pip install pyyaml” to do so.
[otaku@netlab ~]$ sudo pip install pyyamlBasic Jinja2 Template
For our basic template, we will create a template that includes common Cisco IOS configuration lines. We will utilize both configurations that are only a single line, and others that are repeated such as having multiple NTP servers. This will show how YAML and Jinja2 can handle both situations.
A Jinja2 template is simply a file that looks just like the configuration you are trying to make, except that there will be placeholders, called variables, that will be replaced with the data in our YAML data set. Below is the basic configuration that we are looking to turn into a template:
This is a simple configuration for a device. Now lets think about what we would want to change into variables to make this a template. First, is there anything that would be different on a device by device basis? Hostname is the only configuration item I can see that would change on every device. Now what about things that could change in the future? Passwords (enable, local account, and ntp), the local account name, the syslog servers, and ntp servers are all configuration items that could change in the future. Lets see what our configuration template looks like if we use Jinja2 formatting:
We use two simple methods for putting variables into the template. First we have items inside double curley brackets. This is used to put a single variable into the template. What is inside the curley brackets won’t make much sense now, but essentially host is the dataset that we are pulling from, and hostname is the variable within that dataset that Jinja2 will be looking for. Once I show the YAML file and Python script that go along with this template, it should make more sense.
The second way to insert variables is with a simple for loop. {% for server in host.syslog %} is letting Jinja2 know that it should be looking for multiple values under the syslog variable within the dataset named host. The word server can be replaced by any letter or word. Using server just makes it easy to read and understand. The next line is telling Jinja2 what line will be used for every occurance of data within the syslog variable. Server simple matches what was put in the earlier {% %} notation. In this example, for every piece of data under syslog, Jinja2 will put “logging host [data from syslog].” {% endfor %} tells Jinja2 that the loop is finished and to continue on with the template. This same syntax is used for the ntp servers.
You can use your favorite text editor to create this file and save it. Jinja2 does not have a specific file extension, nor does it have a certain character sequence that needs to be put at the front of the file to tell that it is a Jinja2 file. I like to save my files as .j2 as it helps me easily recognize which files are templates.
YAML Data For Our Template
Now that we have our completed template, we need to create a dataset for it to use. Below is our YAML data file that will be used. From looking at the YAML example earlier, and the Jinja2 template we just created, you should be able to decipher what the YAML file is going to look like.
Hostname, enable, username, adminpass, and ntpkey should all look familiar as they are in the same format as the example YAML file from before. Syslog and ntpserver, however, are in a new format. Because these variables contain multiple values, they are put on separate lines and have a dash (-) in front of them. Note that the spacing is important; you need a space before and after the dash. These values will be used when our template uses the {% for %} looping logic.
Using Python To Bridge YAML and Jinja2
We now have our Jinja2 template and YAML data file, but we need a way to have the two interact so that we can produce our completed template. In this example, we will use a Python script from the Network Programmability and Automation book that has been modified for this example. The original script can be found in Chapter 7 Network Configuration Templates > Jinja2 for Network Configuration Templates > Conditionals and Loops. The script is located at the bottom of the page. Below is the full code of the script that I modified, with comments.
#!/usr/bin/env Python ## Above is required as the first line of all python files ## ## Testing Jinja Templates Python Script ## Created 12/1/2016 by NSC (Derived from Network Automation script published in ## Network Programmability and Automation by Jason Edelman, Scott Lowe, and Matt Oswalt) ## This script creates (renders) a template using the template file "l2_baseline.j2" and ## replaces the hostname variable ## ## Import YAML so that the baseline YAML file containing all the data can be loaded import yaml ## Load the jinja2 environment, so Python knows how to interact with the template from jinja2 import Environment, FileSystemLoader ## Set the environment to '.' ## This means that any file names used are in the current directory the script is located in ENV = Environment(loader=FileSystemLoader('.')) ## Load the basic-baseline.j2 jinja2 template file baseline = ENV.get_template("basic-baseline.j2") ## Open the YAML file and render config with open("baseline_data.yaml") as y: host_obj = yaml.load(y) f = open('config.conf', 'w') config = baseline.render(host=host_obj) f.write(config) f.close ## End of ScriptNow lets go through the code to see what it actually does. Let’s start with the shebang. Wait, what?!
#!/usr/bin/env PythonThat is the shebang. It simply tells the script that it is a Python script, so that if the script is run by itself (./script.py) it will work correctly. After the shebang and a bunch of comments (annotated by ##), we have to import both yaml and Jinja2.
import yaml from jinja2 import Environment, FileSystemLoaderImport yaml loads YAML so that python can interact and understand YAML. The next line is another import, but is only going to load certain aspects of Jinja2. We are only importing Environment (an environment for our template) and FileSystemLoader, which allows us to use external files with the template.
Next the script makes a variable called ENV, which uses the Environment that we loaded earlier and sets the location for loading files as the current directory (.).
ENV = Environment(loader=FileSystemLoader('.'))Next we will create a variable for our template (named baseline), and set it to our Jinja2 template (basic-baseline.j2).
baseline = ENV.get_template("basic-baseline.j2")The name of our variable is ‘baseline’ and using the ENV variable (which is set to load files from the current directory) to load the template file named basic-baseline.j2.
After we have everything setup and ready to go, it is time to get to work. First we will use the “with” statement to open up the YAML file:
with open("baseline_data.yaml") as y: host_obj = yaml.load(y)The “with” statement opens the baseline_data.yaml file and uses y as a placeholder for it. Using the “with” statement lets us execute multiple commands against the yaml file and then close it once finished. Because Python doesn’t natively understand YAML (that’s why we had to download pyyaml and import it at the beginning of the script), we must let pyyaml load the file as YAML data. The command “yaml.load” loads the file as a YAML file and the (y) signifies the file that is loaded. We opened the baseline_data.yaml file as ‘y’, and that is why ‘y’ is found in the parenthesis. If you changed ‘y’ to a word such as ‘yaml’ in the with statement, then you would have to change (y) to (yaml).
Once the YAML file is loaded and modified so that python actually understands it as YAML data, then we can actually start creating the rendered template. First we have to create a file that this new, completed template will be saved to.
f = open('config.conf', 'w')We will set this file as the variable f so that we can manipulate the file easily. The command “open” will open a file (and create it if it doesn’t exist). In this example we name the file ‘config.conf’ and the ‘w’ signifies that we are going to be able to write to it.
Now we can actually create the template!
config = baseline.render(host=host_obj)Here we set the template as the variable ‘config’. The next part, baseline.render, is where we actually render the template. Remember that earlier in the script we set the variable baseline to be the location of our template, so here we are rendering the actual Jinja2 template we created. The (host=host_obj) command tells the baseline that the variable host within the template will be equal to host_obj, which is the variable that was set to the actual YAML data. This is why we had variables such as host.hostname within the actual template.
What that is doing is telling the Jinja2 template that host.hostname is equal to the hostname variable within the variable host. Host in this example is connected to the loaded YAML file, and hostname is the name of the actual variable within the YAML file. So ‘host’ is equal to the YAML file, and ‘hostname’ is an actual variable within that YAML file. That is how the template knows how to interact with the YAML file, and why we named the variables inside the Jinja2 template as we did.
Once we have created our completed template, we just need to save it to the file we opened.
f.write(config) f.closeFirst we use f.write(config) to save the variable config (which is our complete template) to the file we opened as f. Then we close the file with f.close. Now you can see why opening the file and setting it to the variable f made writing to and closing it easier. Because we used the “with” statement, once all of our commands are done then the YAML file that was originally opened is closed and the script finishes.
Creating and Running the Script
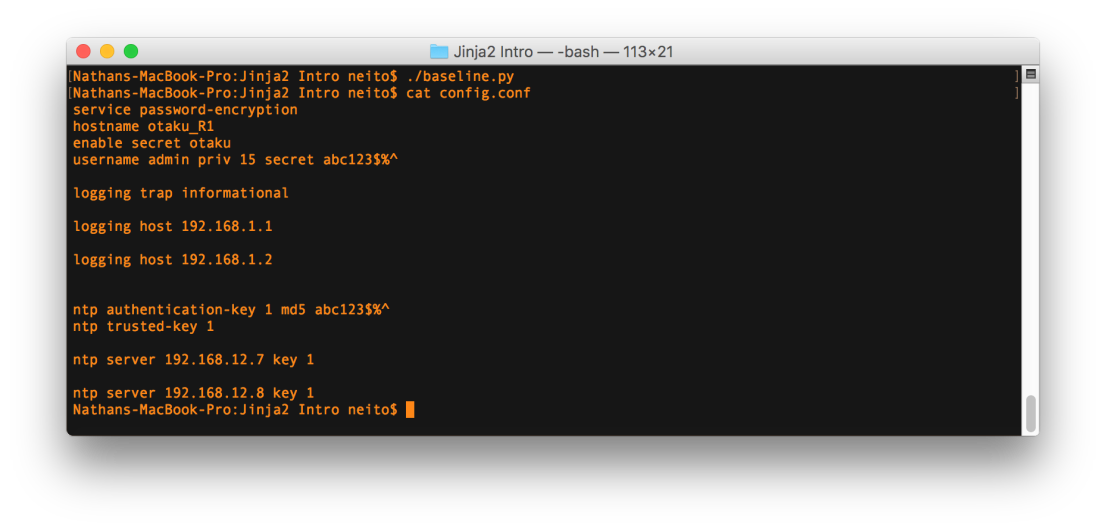
Now that we know exactly how the script works, we can go ahead and create it. Open up your favorite text editor and start typing away! While you can copy and paste, I recommend to type it all out to make you think about what you are typing and what it does. I saved my script as baseline.py. Since we put the shebang inside the script, it can be run on its own. On macOS or Linux, issue the “./baseline.py” command, where baseline.py is the name of your Python script. After you run the script, verify everything worked correctly by viewing the config file with “cat config.conf.”
[otaku@netlab ~]$ ./baseline.py [otaku@netlab ~]$ cat config.conf
Summary
Congratulations! Hopefully you have successfully rendered your first template using Python, Jinja2, and YAML. I don’t think the script itself would have a lot of real world use, but the point of it was to use basic commands that most networkers have seen and used and know that every device needs to have. Don’t worry if this seemed like a lot of information. When you are first introduced to something new, it is going to appear very difficult. If you don’t have much, if any, Python experience, then I would highly recommend the following:


- Learn Python the Hard Way – Great, no-nonsense intro to Python. This should give you a solid understanding of the fundamentals.
- Kirk Byer’s Python Class – Introduction to Python from the perspective of a network engineer. All the examples used are related to networking. If you go through Learn Python the Hard Way and can’t exactly see how it fits with Networking (which I think is what turns most networking people off of coding), Kirk’s class will make it much clearer. I would recommend having some knowledge of Python before taking the class.
- Packet Pusher’s Show 176 – Intro To Python & Automation For Network Engineers – Nice, easy listening as to why you should start using Python and Automation! Good for breaking the ice and giving you more reasons to start. The show notes include a lot of additional material!
- Jason Edelman’s Blog – One of the author’s of the Network Programmability and Automation that has a networking background. Blog contains a lot of good coding/automation focused articles.
- Keeping It Classless – Matt Oswalt’s blog. Like Edelman, his blog contains a lot of good coding/automation articles that involve the networking world.
I hope this introduction has helped spark your interest in coding and automation for network engineers. Although this is a very basic introduction, this small example helped show me how valuable this new skillset can be, and has pushed me to go out and start diving in.

I am a newbie to programming, however, I am a network engineer and I like the idea of automating the generation of configurations files for network devices with out using macros and excel. I’m curious how or if its possible to overlay a web based GUI as a front-end to YAML. I find that having to input data into a YAML file takes away from the elegance of what is trying to be accomplished here. THX
LikeLike
Hi there,
It is possible to put more than one host in the yaml file and still generate a jinja based template based on a particular device type (router or switch)? If so, how do you use logic in jinja or only pick up routers and not firewalls? When it reads the yaml file, does it read every single entity? That’s where I’m confused.
LikeLike
For example, I have a YAML file like this..
—
ip: 10.10.10.10
hostname: core-fw-domain-location
username: admin
password: password
vendor: cisco
type: firewall
ip: 20.20.20.20
hostname: core-rt-domain-location
username: admin
password: password
vendor: cisco
type: router
When I incorporate jinja2 into the picture and use logical if statements, {{ % if node.ip == 10.10.10.10 %}, how does it know when to stop processing from the YAML file as everything is within the same hierarchy?
LikeLike
If you check out my Ansible blog (http://networkotaku.com/2017/10/24/network-configuration-templates-with-ansible-and-jinja2/), it shows you how to use Ansible to accomplish exactly what you are asking. Ansible makes it a lot easier and takes away having to do the manual python program creation.
Basically you pull your hosts into another file (inventory) and can then group them such as all routers together, all switches together, and all firewalls together.
LikeLike
Thanks. This is great post. I never used jinja and YAML before, but I was able to follow your post and create a config file.
Similar to Stan’s question,
One question I have is, how would you create multiple config files using YAML and jinja?
For example, with one base template, i want to be able to create 100 switch configs with different management ip, hostnames (host1=10.0.0.1, host2=10.0.0.2, and so on) then output to different files.
Since it’s same type (ios), maybe it can be done without ansible? or ansible is still easier answer here?
LikeLike
Hey Andrew, you can also check out:
github.com/superloopnetwork/superloop
I think this will accomplish exactly what you want to do. Pretty powerful.
LikeLike
I found this very useful. Thank you and thank you for the book recommendation. As someone who was in the Networking field before all these “programmability” stuff started, I found it scary (maybe because I never looked into it) but this has given me courage – it’s actually pretty standard programming.
LikeLike